Tools for creating clean Python environments
What I've leared after trying Conda, Pipenv and Poetry

It would take way too long to list all of the ways I’ve installed and managed Python on local and remote machines. I’ve done everything from downloading a zip on Windows machine to brew install python.
I’ve read dozens of blog posts and opinions on this subject. I still haven’t found one that is exactly what I was looking for when I started out.
That’s what this post is for: if you want to easily start using Python for multiple projects – say, pulled from GitHub – and you know enough that you don’t want to pollute your system-wide Python distribution with tons of pip install commands.
When I started using virtual environments, I didn’t really know what they were. That’s probably my fault for not reading carefully enough. Nevertheless, if you’re like me in the past, then: Python virtual environments are simply directories where Python files are kept. There’s a little more to it than that. I like how this post explains them in more detail (and adds in a lot of cool Doré images).
Who may find this post helpful:
- Beginner/intermediate Python users who have used virtual environments
- Those who manage their Python projects and environments in a terminal
- Mostly for macOS and Linux users – only brief mention of Windows
- Those who have made a royal mess of their machine’s Python installation before
Now, let’s start with a discussion of conda.

Conda
Some basic usage:
# create a new environment
conda create --name myenv
# activate the environment
conda activate myenv
# install pandas package in environment
conda install pandas
# see you environments - trust me you'll need this
conda info --envs
When I was starting out as a data scientist using Python – every other day Googling “python development setup for data science” – conda was the most recommended way to get started. It’s a natural place to start.
Conda has some great features. You can specify the version of Python you’d like to use when creating a new environment. And environments aren’t tied to a directory; you can activate them from anywhere.
However, I always faced a few problems using conda:
- What do I name the environment?
- What did I name the environment I want to activate? I never remembered and always refer to listing out all of my conda environments.
- Will I use it for another project? Maybe. But almost always I did’t end up reusing environments for another project.
When installing packages in your conda environment, another problem may soon become apparent. For example, I use the package dotenv quite a bit. However, conda install python-dotenv won’t work. That’s because you need to specify the channel – i.e. package repository – on which it can be found. In this case, it’s on Conda-Forge.
You can find more on channels in the documentation. But suffice it to say, conda doesn’t use PyPI, the official repository for third-party packages. This is where pip goes to look for packages when you run pip install pandas.
Another complaint I had with conda comes purely from my personal experience. I could not get it to work across platforms, namely from macOS to Windows. I have colleagues who use Windows. So, when I shared an environment.yml file with them to recreate my development environment, I was disappointed with how many errors were thrown in the setup process.
I’ve never actually seen anyone use the yaml files to successfully build an environment moved from macOS to Windows with the command: conda env create -f environment.yml. They always had to manually install packages the that failed. Inevitably, these packages would then have different versions than mine. And just like that, we’re no longer developing in the same environment. This led me to seek out better options.
Pipenv
Some basic usage:
# create environment in current directory
pipenv install
# install pandas in environment
pipenv install pandas
# run a script using environment
pipenv run python script.py
# activate the environment
pipenv shell
Having had no success with sharing conda environments from macOS to Windows, I decided to experiment with a controversial Python packaging tool – Pipenv. For a project at work, I was required to move a Python project from my local Macbook to a secure Windows VDI (please don’t ask me about this experience :] ).
Despite all the derision directed at it, I was surprised how easily it worked for me. I created a requirements.txt for the project that I needed to move. After copying it to the Windows VDI, I just changed into the project directory and ran pipenv install. And magic! A new environment was created exactly how it was on my local Macbook. I didn’t see any package installation failures. It was so easy that I thought I had stumbled upon some secret Python package management Valhalla. Well, except for all those Pipfile lock errors I kept getting once I needed to install new packages.
The constant lock errors and the slowness of installing are two of the first pain points I noticed with Pipenv.
Here’s an example of locking error installing black in a Docker container:
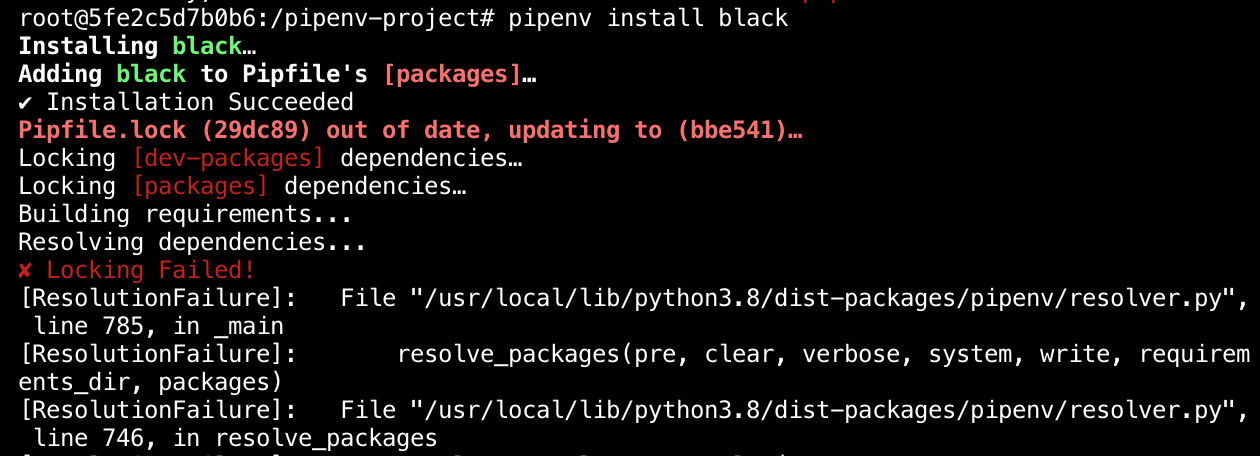
I saved you an additional 10 lines of error messages in this example, but you get the point. Unfortunately, the story of Pipenv doesn’t end with a “happily ever after.” Pipenv is controversial for good reasons. I won’t drag it all out here since there is already a comprehensive post that does this.
While Pipenv felt like magic at first, it’s kind of slow, not many people advocate using it in the Python community from what I can tell and I kept seeing those locking errors. Oh, those locking errors. Moreover, as data scientists, machine learning engineers, statisticians – or whatever you call yourself – start using Python more and more, it’s important to learn more about the tools non-data science Python programmers use for packaging, deployment, and managing dependencies. That’s what motivated me to check out the next tool, Poetry.
Poetry
Some basic usage:
# create a new project and directory called "project"
poetry new project
cd project
# install pandas
poetry add pandas
# run a python command in environment
poetry run python -V
# activate environment
poetry shell
Recently, I learned about a new kid on the block in packaging and dependency management: Poetry. It’s a lot like Pipenv but appears to work more smoothly and makes it easy for building packages – which I find myself doing more and more. These days, my Python projects involve writing some source code scripts for a project and importing them like a normal Python module into a Jupyter notebook and using it in data analysis and modeling.
Poetry automatically sets up a standard Python package repo for you with the poetry new <project-name> command. It even creates a directory for tests, which you should absolutely be doing for any Python project that spans a substantial amount of lines.
Poetry has some other cool features that make it easier to publish your Python library to PyPI. But that’s beyond the scope of this post.
Poetry is what I’ll be using for now – as a data scientist using Python. That is, until I have to install Tensorflow.
Conclusion
I’m beginning to move more towards using Docker, which for the most part, makes virtual environments pointless. That would be a bad way to end this post – to talk about everything but Docker and then end saying that I use Docker. So, I’ll shelve the Docker discussion for another day.
Where is my current thinking on managing Python environments? Pipenv works across platforms easily. I’ve seen this firsthand. But with the long installation times and constant locking issues, I don’t see a reason to use it over Poetry.
For me, conda isn’t as useful these days. I don’t currently work on projects with crazy C++ dependencies, or projects that use both R and Python. I haven’t had good experience with conda working across platforms, which is important when you have Windows collaborators or when you want to move a local project to Docker (Oh! I forgot, we’re not talking about Docker). But I might return to conda if it’s the easiest way to install some fancy library or framework I need, like Tensorflow. If this happens, I’ll create an update post with plenty of penance.
And that’s the main takeaway. Find the best tool for your job. That’s the special sauce data scientists bring to their analysis and modeling. The same goes for creating tidy, reproducible development environments for your projects.
Still need help choosing which tool to use?
What if you want a tool that is not tied to a single directory, or the system’s version of Python, or even Python at all?
- Removing the single directory constraint:
- One very relatable gripe of the post critiquing Pipenv is: Pipenv and Poetry virtual environments are not easily activated outside of their project’s directory – One way around this is using the “standard tools” Pip and virtualenv.
- Also, conda allows you to activate an environment anywhere.
- Using multiple versions of Python:
- Poetry suggests using pyenv before creating a new environment
- Conda does this out-of-the-box
- On not using Python:
- Ok, this is firmly beyond scope of this post now. But in the case that your data science project doesn’t use just Python, then consider conda or whatever popular package manager there is for the programming language.
Bonus: Docker stuff
Here’s the Dockerfile I used for the Ubuntu container where I tested Pipenv and Poetry.
FROM ubuntu:latest

RUN apt-get update \
  && apt-get install -y python3-pip python3-dev \
  && cd /usr/local/bin \
  && ln -s /usr/bin/python3 python \
  && pip3 install --upgrade pip

ENTRYPOINT ["/bin/bash"]
In the same directory as this Dockerfile, build the image: docker build -t test-python-env ..
And then run a container: docker run -it -p 8888:8888 --name brian-test test-python-env. In this case, I wanted to test Jupyter notebooks so I binded the host and container 8888 ports.